You can enter purchased and liability invoices into the eFactoring application either manually or in batches. The menu is used for the manual entry of purchased and liability invoices. Manual entry can be useful if you cannot carry out file export from your ERP system or if you want to enter a small number of invoices into the eFactoring application to be handed over to the factoring company for processing.
New Purchased Invoice
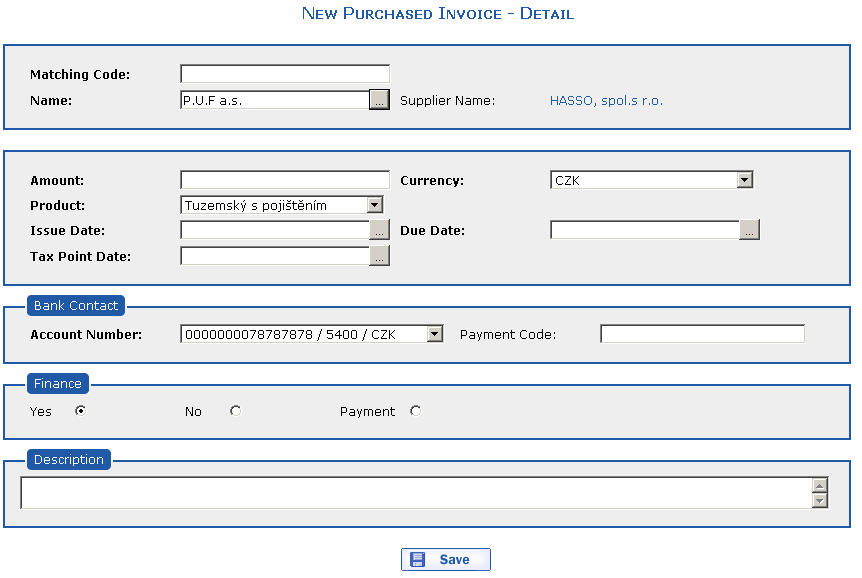
After selecting the option, the New Purchased Invoice—Detail dialog appears. You can enter the following items into the New Purchased Invoice dialog:
-
Matching Code—purchased invoices
-
Customer Name—click the icon and select the relevant customer
-
Supplier Name—your company's name is automatically filled in
-
Amount, Currency—enter the amount and the currency of the purchased invoice
-
Product—select the factoring type
-
Issue Date, Due Date, Tax Point Date of a purchased invoice
-
Account Number—your company bank account to which pre-financing is paid
-
Financing—select the invoice pre-financing method
-
Yes—the new purchased invoice will be pre-financed by the factoring company
-
No—the new purchased invoice will not be pre-financed by the factoring company but it is possible to pre-finance it in the future
-
Payment—the purchased invoice will not be pre-financed by the factoring company and it will not be possible to pre-finance it in the future
-
-
Note—you can enter additional information relating to the purchased invoice
The items in bold are so-called mandatory items which you must always fill in so that the invoice can be saved.
After selecting the customer, the Account Number, Currency and Payment Code items are filled in according to the business transaction as follows:
-
The Supplier Account Number is pre-set according to the Currency item in which the given business transaction is stated. If no currency is matched to the bank account, the user can select the required bank account from the combo box menu.
-
If the Account Number item changes, the application synchronizes the Account Number and Payment Code items while the Currency item remains the same.
-
If the Currency item changes, the application synchronizes the Account Number and Payment Code items.
If you select a currency, e.g. CZK, the bank account will automatically be filled in with this currency if only one account exists in the selected currency.
The Product, Currency, Account Number and Payment Code items are automatically filled in if you fill in the Customer.
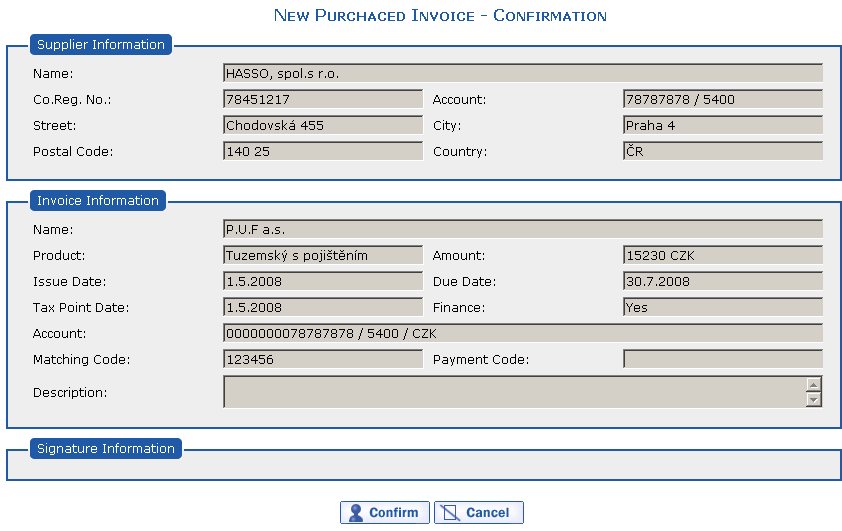
As soon as all the required items are filled in, press the
 button. The
checks necessary for invoice processing are carried out and the dialog is
displayed including the invoice electronic key signature. After pressing
the
  button,
the invoice is sent to the factoring company.
If the entered due date of the purchased invoice is later than the issue date increased by the maximum permitted payment period, a confirmation dialog (Yes/No) is displayed on the screen. The invoice is inserted only if the Yes option is selected; otherwise the user is redirected to the editing form of the invoice.
A sent invoice cannot be further edited in the eFactoring application.
New Liability Invoice
The functionality is accessible only if the client has a customer business transaction available.
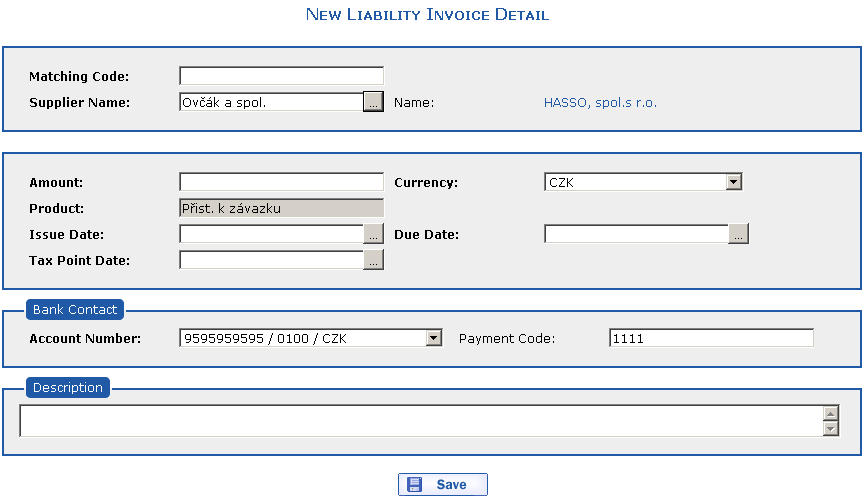
After selecting the option, the New Liability Invoice—Detail dialog appears. You can enter the following items into the New Liability Invoice dialog:
-
Matching Code of the liability invoice
-
Supplier Name—click the icon and select the relevant supplier
-
Customer Name—your company's name is automatically filled in
-
Amount, Currency—enter the amount and the currency of the liability invoice
-
Product—the product type is automatically filled in
-
Issue Date, Due Date, Tax Point Date of the liability invoice
-
Account Number—the supplier bank account to which the invoice financing is paid
-
Note—you can enter additional information relating to the liability invoice
The items in bold are so-called mandatory items which you must always fill in so that the invoice can be saved.
After pressing the key, the current date is entered into the date item (the current date in the operating system).
The application changes the Account Number, Currency and Payment Code items after the supplier has been selected according to the business transaction based on the following rules:
-
The Supplier Account Number is pre-set according to the Currency item in which the given business transaction is stated. If no currency is matched to the bank account, the user can select the required bank account from the combo box menu.
-
If the Account Number item changes, the application synchronizes the Account Number and Payment Code items while the Currency item remains the same.
-
If the Currency item changes, the application synchronizes the Account Number and Payment Code items.
If you select a currency, e.g. CZK, the bank account will automatically be filled in with this currency if only one account exists in the selected currency.
The Product, Currency, Account Number and Payment Code items are automatically filled in if you fill in the Supplier.
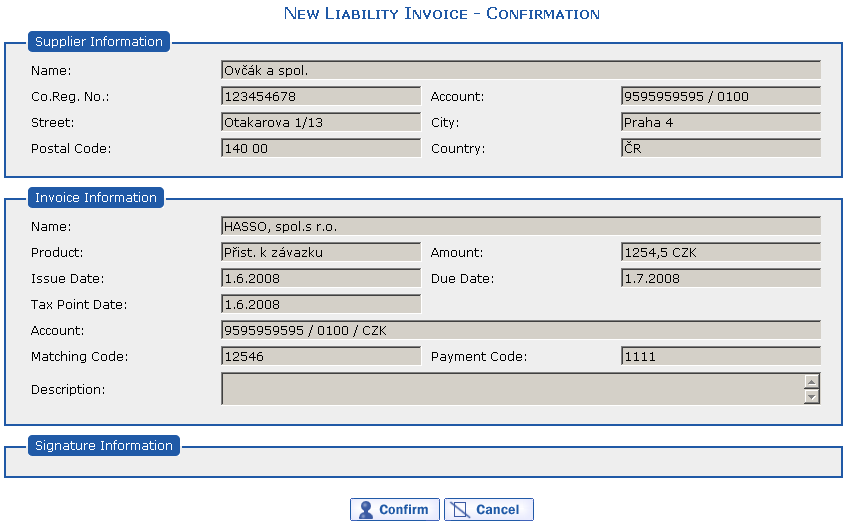
As soon as all the required items are filled in, press the
 button. The
checks necessary for invoice processing are carried out and the dialog is
displayed including the invoice electronic key signature. After pressing
the
  button,
the invoice is sent to the factoring company.
If the entered due date of the purchased invoice is later than the issue date increased by the maximum permitted payment period, a confirmation dialog (Yes/No) is displayed on the screen. The invoice is inserted only if the Yes option is selected; otherwise the user is redirected to the editing form of the invoice.
A sent liability invoice cannot be further edited in the eFactoring application.
Copyright © ARBES, 2019


 New Purchased Invoice—automatic filling of items
 New Purchased Invoice—automatic filling of items


